Friday, 6 December 2013

PRINCE2 Processes


PRINCE2 is a process-based approach for project management providing an easily tailored, and scaleable method for the management of all types of projects. Each process is defined with its key inputs and outputs together with the specific objectives to be achieved and activities to be carried out.

Directing a Project:-

Directing a Project runs from the start-up of the project until its closure. This process is aimed at the Project Board. The Project Board manages and monitors via reports and controls through a number of decision points.
The key processes for the Project Board break into four main areas:
  • Initiation (starting the project off on the right foot)
  • Stage boundaries (commitment of more resources after checking results so far)
  • Ad hoc direction (monitoring progress, providing advice and guidance, reacting to exception situations)
  • Project closure (confirming the project outcome and controlled close).
  • This process does not cover the day-to-day activities of the Project Manager.

Starting up a Project:-

This is the first process in PRINCE2. It is a pre-project process, designed to ensure that the pre-requisites for initiating the project are in place.
The process expects the existence of a Project Mandate which defines in high level terms the reason for the project and what outcome is sought. Starting up a Project should be very short.
The work of the process is built around the production of three elements:
  • Ensuring that the information required for the project team is available
  • Designing and appointing the Project Management Team
  • Creating the Initiation Stage Plan.

Initiating a Project:-

The objectives of Initiating a Project are to:
  • Agree whether or not there is sufficient justification to proceed with the project
  • Establish a stable management basis on which to proceed
  • Document and confirm that an acceptable Business Case exists for the project
  • Ensure a firm and accepted Foundation to the project prior to commencement of the work
  • Agree to the commitment of resources for the first stage of the project
  • Enable and encourage the Project Board to take ownership of the project
  • Provide the baseline for the decision-making processes required during the project’s life
  • Ensure that the investment of time and effort required by the project is made wisely, taking account of the risks to the project.

Managing Stage Boundaries:-

This process provides the Project Board with key decision points on whether to continue with the project or not.
The objectives of the process are to:
  • Assure the Project Board that all deliverables planned in the current Stage Plan have been completed as defined
  • Provide the information needed for the Project Board to assess the continuing viability of the project
  • Provide the Project Board with information needed to approve the current stage’s completion and authorise the start of the next stage, together with its delegated tolerance level
  • Record any measurements or lessons which can help later stages of this project and/or other projects.

Controlling a Stage:-

This process describes the monitoring and control activities of the Project Manager involved in ensuring that a stage stays on course and reacts to unexpected events. The process forms the core of the Project Manager’s effort on the project, being the process which handles day-to-day management of the project.
Throughout a stage there will be a cycle consisting of:
  • Authorising work to be done
  • Gathering progress information about that work
  • Watching for changes
  • Reviewing the situation
  • Reporting
  • Taking any necessary corrective action.
This process covers these activities, together with the on-going work of risk management and change control.

Managing Product Delivery:-

The objective of this process is to ensure that planned products are created and delivered by:
  • Making certain that work on products allocated to the team is effectively authorised and agreed accepting and checking Work Packages
  • Ensuring that work conforms to the requirements of interfaces identified in the Work Package
  • Ensuring that the work is done
  • Assessing work progress and forecasts regularly
  • Ensuring that completed products meet quality criteria
  • Obtaining approval for the completed products.

Closing a Project:-

The purpose of this process is to execute a controlled close to the project. The process covers the Project Manager’s work to wrap up the project either at its end or at premature close. Most of the work is to prepare input to the Project Board to obtain its confirmation that the project may close.
The objectives of Closing a Project are therefore to:
  • Check the extent to which the objectives or aims set out in the Project Initiation Document (PID) have been met
  • Confirm the extent of the fulfilment of the Project Initiation Document (PID) and the Customer’s satisfaction with the deliverables
  • Obtain formal acceptance of the deliverables
  • Ensure to what extent all expected products have been handed over and accepted by the Customer
  • Confirm that maintenance and operation arrangements are in place (where appropriate)
  • Make any recommendations for follow-on actions
  • Capture lessons resulting from the project and complete the Lessons Learned Report
  • Prepare an End Project Report
  • Notify the host organisation of the intention to disband the project organisation and resources.

Planning:-

PRINCE2 recommends three levels of plan to reflect the needs of the different management levels involved in the project, stage and team.
Planning is a repeatable process and its activities are included within the seven main PRINCE2 processes, as appropriate. Information about plans and how to plan can be found in the Plans Theme section of the PRINCE2 Manual.
The activities of planning are :-
  • Design the plan
  • Define and analyse the products
  • Identify the activities and dependencies
  • Prepare estimates
  • Prepare the schedule
  • Analyse the risks
  • Document the plan
PRINCE2 uses a technique known as ‘Product based planning’ which requires four activities :-
  • Write the Project Product Description
  • Create the product breakdown structure
  • Write the product descriptions
  • Create the product flow diagram
These four activities are performed within the ‘Define and analyse the products’ activity above.

PRINCE2 Methodology


PRINCE2 – A Structured Project Management Methodology:

PRINCE2 (PRojects IN Controlled Environments) is a process-based method for effective project management. PRINCE2 is a de facto standard used extensively by the UK Government and is widely recognised and used in the private sector, both in the UK and internationally.
Whenever we decide we want to do something, go somewhere, build something, or achieve something, we need to know the answer to some questions:
  • What are we trying to do?
  • When will we start?
  • What do we need?
  • Can we do it alone, or do we need help?
  • How long will it take?
  • How much will it cost?
These are the usual questions asked at the start of any project, and the answers are the building blocks of project management – defining what we want to do and working out the best way we can do it.
Structured project management means managing the project in a logical, organised way, following defined steps. A structured project management method like PRINCE2 is the written description of this logical, organised approach
The PRINCE2 Methodology says that a project should have:
  • An organised and controlled start ie. organise and plan things properly before leaping in
  • An organised and controlled middle ie. when the project has started, make sure it continues to be organised and controlled
  • An organised and controlled end ie. when you’ve got what you want and the project has finished, tidy up the loose ends.
In order to describe what a project should do and when, PRINCE2 has a series of processes which cover all the activities needed on a project, from starting up to closing down.

PRINCE2 Project Management Roles:-

Project Manager:-

Organising and controlling a project means that we need to have someone responsible for doing the organising and controlling. This person is called the Project Manager.
The Project Manager will select people to do the work on the project and will be responsible for making sure the work is done properly and on time.
The Project Manager draws up the project plans that describe what the project team will actually be doing and when they expect to finish

Customer, user and supplier:-

The person who is paying for the project is called the customer or executive.
The person who is going to use the results or outcome of the project, or who will be impacted by the outcome of a project, is called the user.
On some projects, the customer and user may be the same person. The person who provides the expertise to do the actual work on the project (ie. will be designing and building the outcome) is called the supplier or specialist.
All of these people need to be organised and co-ordinated so that the project delivers the required outcome within budget, on time and to the appropriate quality.

Project board:-

Each PRINCE2 project will have a project board made up of the customer (or executive), someone representing the user side, and someone representing the supplier or specialist input.
In PRINCE2, these people are called customer, senior user and senior supplier respectively.
The Project Manager reports regularly to the project board, keeping them informed of progress and highlighting any problems he/she can foresee.
The project board is responsible for providing the Project Manager with the necessary decisions for the project to proceed and to overcome any problems.

PRINCE2 Project Management Techniques:-

Project assurance:-

Providing an independent view of how the project is progressing is the job of project assurance. In PRINCE2, there are three views of assurance:business, user and specialist. Each view reflects the interests of the three project board members.
Assurance is about checking that the project remains viable in terms of costs and benefits (business assurance), checking that the users’ requirements are being met (user assurance), and that the project is delivering a suitable solution (specialist or technical assurance). On some projects, the assurance is done by a separate team of people called the project assurance team, but the assurance job can be done by the individual members of the project board themselves.

Project support:-

On most projects there is a lot of administrative work needed: keeping everyone informed, arranging meetings, keeping plans up-to-date, chasing things up, keeping files, etc. Project Managers often do all this work themselves, particularly on smaller projects, but if there are a number of projects going on at the same time a Project Support Office can be setup to help the Project Managers with this work.

PRINCE2 Scope:-

In today’s projects, there are often different groups of people involved, including the customer, one or more suppliers, and of course the user. PRINCE2 is designed to provide a common language across all the interested parties. Bringing customers and suppliers together generally involves contracts and contract management. Although these aspects are outside of PRINCE2, the method recognises the need to provide projects with the necessary controls and breakpoints to work successfully within a contractual framework.

Controlling Change:-

Apart from describing the different people involved on a PRINCE2 project, and what they are each responsible for, the method also explains how to manage risk, how to manage quality, and how to control change on the project. Risk management is about working out what could go wrong and planning what to do if it does. Quality Management is about checking the quality of work done on the project, either by testing it or reviewing the work in some way.
There are always lots of changes during the life of a project, people change their minds, other things happen which affect what the project is doing. PRINCE2 has a technique of controlling the way changes impact the project in order to prevent the project going off in the wrong direction.
So, PRINCE2 is a method for managing projects. It helps you work out who should be involved and what they will be responsible for. It gives you a set of processes to work through and explains what information you should be gathering along the way. But PRINCE2 doesn’t do the work for you, it cannot guarantee that your projects will be successful. Good projects, which deliver quality results, on-time and within budget are dependent on the quality of people involved from Project Board down to individual team members.

PRINCE2 Overview


PRINCE2 Definition:-

PRINCE2 (an acronym for PRojects IN Controlled Environments) is a de facto process-based method for effective project management. Used extensively by the UK Government, PRINCE2 is also widely recognised and used in the private sector, both in the UK and internationally. The PRINCE2 method is in the public domain, and offers non-proprietorial best practice guidance on project management.

Key features of PRINCE2:

  • Focus on business justification
  • Defined organisation structure for the project management team
  • Product-based planning approach
  • Emphasis on dividing the project into manageable and controllable stages
  • Flexibility that can be applied at a level appropriate to the project.

PRINCE2 History:-

PRINCE was established in 1989 by CCTA (the Central Computer and Telecommunications Agency), since renamed the OGC (the Office of Government Commerce). In June 2010, the Office of Government Commerce Best Practice Management functions moved into the Cabinet Office.
PRINCE was originally based on PROMPT, a project management method created by Simpact Systems Ltd in 1975, and adopted by CCTA in 1979 as the standard to be used for all Government information system projects.
When PRINCE was launched in 1989, it effectively superseded PROMPT within Government projects. PRINCE remains in the public domain and copyright is retained by the Crown. PRINCE2 was published in 1996, having been contributed to by a consortium of some 150 European organisations.

How PRINCE2 Can Benefit You or Your Organisation:-

Using PRINCE2 provides you with greater control of resources, and the ability to manage business and project risk more effectively. This will benefit:
  • Individuals seeking leading project management skills and greater employment prospects
  • Project managers
  • Directors/executives (senior responsible owners) of projects, and
  • Organisations.
For organisations, PRINCE2′s formal recognition of responsibilities within a project, together with its focus on what a project is to deliver (the why, when and for whom) provides your organisation’s projects with:
  • A common, consistent approach
  • A controlled and organised start, middle and end
  • Regular reviews of progress against plan
  • Assurance that the project continues to have a business justification

FICA: BPC-3. Deferrals & Installment plans


The business transaction “Installment plan” enables to arrange payment by installments for the receivables (like new connection security deposit) as per the connection plan offered to the customer.
The installment amount and due date depends on the installment plan type. The individual installments and their due dates are specified in the Installment plan. To avoid having due dates fall at the weekend or on public holidays, refer to the factory calendar when determining these dates.

Instalment Plan

An instalment plan consists of a statistical document with several instalment receivables. The individual instalment receivable will be cleared upon payment. The number of instalment plan is stored is saved in the stored items of the Business Partner (Customer).

Business Processes involved:-

01.01   Create Installment plan

When User creates an installment plan, the company code, contract etc are taken from the original item, as long as these fields have the same value in all original items selected.
When User enters a charges amount, the system posts a document for the installment plan charges. During posting charges documents is automatically transferred to the installment plan for the source receivables.
T-Code: FPR1

01.02   Change Installment plan

It is possible to
    1. Delete installments or add further installments
    2. Change the due date and the amount of each individual installment receivable, provided the installment receivable has not yet been paid (at the time of Alteration modification to the existing connection customer requests for the installment plan change i.e. add or delete installments)
    3. Deactivate installment plan (at the time of Contract Termination or permanent disconnection)
T-Code: FPR2

01.03   Display Installment plan

    1. Display installment plan changes
    2. Display/change processing locks
T-Code: FPR3

Related User Roles:-

SAP_FI_CA_OUTSTANDING_PAYMENTS Create / Change / Display Installment Plans. Installment plan History.


Basic Configurations:-

instalment-config

Posting Areas related :-

1100  Installment Plan Default Entries
1101  Installment Plan Charges Specifications
1105  Installment Plan Interest: Specifications
R490  Charge for Items in Installment Plan
1103  Inst.Plan: Activate Enhancement for Surcharges/Interest
1104  Inst.Plan: Exclude Main/Subtransaction for Surcharges

Events Related:-

120    Clearing: Distrib. Amount to Coll. Inv./Inst. Plan/Bundling
708    Correspondence: Print Installment Plan
709    Correspondence: Create Installment Plan
728    Correspondence: Print Payment Forms for Instlmts
729    Correspondence:Create Payment Forms for Instlmts
1760    Mass Activity: Print Installment Plans
1761    Mass Activity: Installment Plan Printing (Move Parameters)
1817    Mass Act.: Select Installment Plan for BW
1818    Mass Act.: Select Installment Plan for BW, Shift Parameters
1880    Mass Activity: Snapshot of Installment Plan on Key Date
1881    Adjuster Module for Installment Plan Analysis for Key Date
1882    Distribution Algorithm – Installments for Source Receivables
2525    BW: Read and Buffer Master Data for Installment Plans
2530    BW: Maintain Additional Fields for Installment Plans
3000    Installment Plan: Transfer Fields from Source Itms
3005    Installment Plan: Change Amount and Due date
3010    Installment Plan: Select Source Receivables
3015    Installment Plan: Display Additional Fields
3020    Installment Plan: Exclude Source Receivables (1)
3025    Installment Plan: Exclude Source Receivables (2)
3026    Installment Plan: Consistency Checks
3027    Installment Plan: Applictn-Specific Add. Checks
3028    Installment Plan: Hide Functions
3029    Installment Plan: Check for IS-U Payment Schedule
3030    Installment Plan: Determine Calendar ID
3031    Installment Plan: Determine Print Type for Payment Forms
3032    Installment Plan: Changing Charge Amount
3033    Installment Plan: Penalty Charge/Inflation Offset (Brazil)
3040    Installment Plan: After Creation
3041    Installment Plan: After Change
3044    Installment Plan After Deactivation (Orig. Clearing Info)
3045    Installment Plan: After Deactivation
3050    Installment Plan: Print
3055    Installment Plan: Additional Fields on Screen 0300
5506    Dual Control Principle: Check Installment Plan

Wednesday, 7 August 2013

FICA : BPC-2. Security Deposits


Generally this is the process of accounting of Security Deposit collected from customers.

Security Deposit Management:-

Collecting of security deposits required from Business partners.
Tracking of security deposits collected from Business partners.
Refund of the security deposit when it is no longer required.

Type of Security Deposits:-

Cash Security Deposits (Accepted in terms of Cash or Check)
Non-Cash Security Deposits (In terms of Bank Guarantee or Letter of Credits or other available means)

Business Processes involved:-
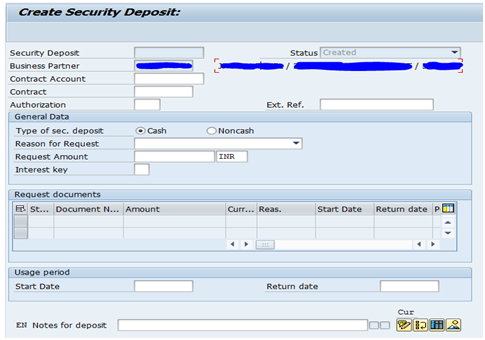
  1. 1.       Request of Security Deposits
The request is usually generated when a Business Partner is moved in.
The security deposit requests are at the contract level.
Always creation of the security deposit is a manual process which triggers a security deposit request transaction, for mass creation you can develop a custom program to trigger this transaction.

Base T-Code = FPSEC1


1 fpsec12 fpsec1
  1.  2.       Receipt of Security Deposits
There is no financial transaction taking place in case of a Non Cash Security Deposit.
Cash Security Deposit paid by customer to the Company will be shown as a protected credit item in Business Partner account.
Cash Security Deposit once realized can’t be set-off against any other open item in customer ledger, during the account maintenance or payments made (Down Payment Concept).
The security deposit should have to be released from down payments first to set off against any other open item.
Instalment payment plan for security deposits is allowed based on certain criteria & can be customized as per requirements.

Base T-Code (Cash): FP05 / FP25 / FPCJ

 (After Receipt status would change to PAID)


3 fpsec3

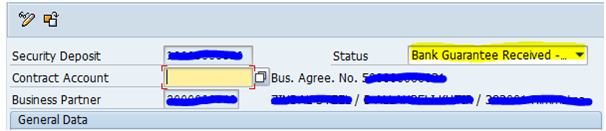
Base T-Code (Non-Cash): FPSEC2

 4 fpsec3

(After Realization Status would change to RECEIVED)

5 fpsec3
  1. 3.       Enhancement / Revision of Security Deposits:-
Security Deposit can be revised based on
Consumption history
Request for change of plan type
Revision of gas price
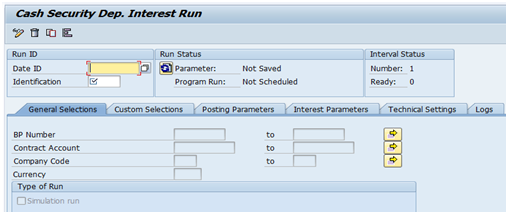
  1. 4.       Interest on Security Deposits:-
Interest on Cash security deposits can be calculated based on Interest Key.
The calculated interest is credited to the Business partner account till the date of release the security deposit (If released).

Base T-Code-1: FPI2

6 fpi2

Base T-Code-2: FPINTM2

7 fpintm2
  1. 5.       TDS on Interest paid for Cash Security Deposits:-
The net interest amount will be posted to the Business Partner after deduction of Withholding tax amount (TDS).
Withholding tax payment will be happen through Finance module.
TDS certificate will be generated to Business partner from FICA module.
  1. 6.       Refund / Release of Security Deposit:-
Security deposits are released manually or by system itself, reasons are,
Contract Termination
Final Billing / Invoicing
Name Transfer
Change in business Policy
Change in Plan, etc

Security deposit is now available to set off against open items in customer’s account if any. Otherwise it will remain ‘On Account’ which can be refunded to customer via check.

Base T-Code: FPRL

8 fprl

Basic Configurations:

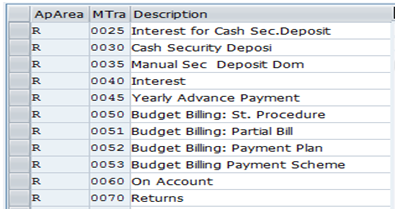
Posting Areas related to Security Deposits:

0800  Special Settings for Securities
0801  Specifications for Clearing Security deposit
1081  Cash Deposit Interest: Specifications
R200  Collateral transfer specifications for change of address
R201  Reverse collateral transfer specification for change of address
1083  Mass Activity Interest on Cash Security deposit
1086  Assign Transactions to Withholding Tax Code & Interest Key

EVENTS (SAP EXITS) Related to Security Deposits:

716      Correspondence: Print Security Request
717      Correspondence: Create Security Request
726      Correspondence: Print Cash Sec.Dep.Interest
727      Correspondence: Create Cash Sec.Dep.Interest
800      Security Deposit: Determine Transaction
810      Security Deposit: Determine Amount
820      Security Deposit: Master Data Check
830      Security Deposit: Form Printout
840      Security Deposit: Contract Check
860      Security Deposit: Due Date Monitoring
870      Release of Cash Security Deposit: Additional Checks
1778    Mass Activity: Cash Security Deposit Interest Calculation
2005    Cash Sec. Dep. Int: Interest Key Determination

Following are the configurations related to Security Deposits:-
 
9 spro
  • Define General Parameters for Security Deposits
10 spro
  • Define security deposit Reasons
11 spro
  • Define Non-cash security deposit Category
12 spro
  • Define Status for Non-Cash Security Deposit
13 spro
  • Define Number Ranges for Security deposit (T-Code: FPSEC0)
  • Define Reversal Reason for Security Deposit
14 spro
  • Maintain Components for Calculating Revised Security deposit
  • & other configurations as per requirement.

FICA : BPC-1. Account Determination


This deals with the “Account Determination ID” that is used to determine the Main Transaction and Sub transaction – relevant account assignment data. It is determined from the master data of the contract account to which the business partner item is posted. It separate the set of GL’s for Receivable and Revenue Income for each type of customers.

* System automatically maps the Account Determination IDs for different types of Business partners.
* System automatically determines the respective GL accounts based on the Business Partner type.

Terms Involved:

Account Determination ID:-

It is a combination of main and sub-transactions in SAP FICA.
The main transaction controls the determination of receivables and payable accounts.
 The Sub-transactions controls the determination of revenue accounts.
The determination of receivables accounts which are to be posted depends on the different
  1. Company codes,
  2. Division (Gas/ Power/ Water),
  3. Account determination ID and
  4. Main transaction.
  5. GL Account.
Configurations:
Following are the configurations related to account determination:-
  • Define Main Transactions
main tr
  • Define Sub-Transactions
2 Sub tr
  • Assign Main transactions with GL account in EK01
3 EK01
  • Assign Sub-transactions with GL account in EK02
4 EK02
  • Define Document types for SD
5 SD Doc types
  • Derive Main/Sub-Transaction from SD information
6 SD Acc Dterm
  • Define postings to FI-CA for Customer Account Groups
7 transactions

FICA : General Business Process Configurations (GBPC)


Here we will consider all possible business processes in ISU FICA module & their relevant configurations.

Some of the process listing is as follows…

BPC-1. Account Determination
BPC-2. Security Deposits
BPC-3. Installment plans
BPC-4. Collection management
BPC-5. Clearing strategy
BPC-6. Interest Calculation
BPC-7. Transfer of items
BPC-8. Return Management
BPC-9. Dunning
BPC-10. Transfer to General Ledger
BPC-11. Manual Postings
BPC-12. Reversal of documents
BPC-13. Reset Clearing
BPC-14. Write off
BPC-15. Doubtful individual value adjustments
BPC-16. Submission to collection agencies
BPC-17. Late payment charges (LPC)
BPC-18. Period end closing.
BPC-19. Direct Debit
BPC-20.Check Management

All these processes are elaborated with further details in next posts…